ウキフカセ釣り
💧 Salt🎣 Bait📍 Shore
Rock Fishingメジナクロダイマダイ
Basic Structure of the Rig
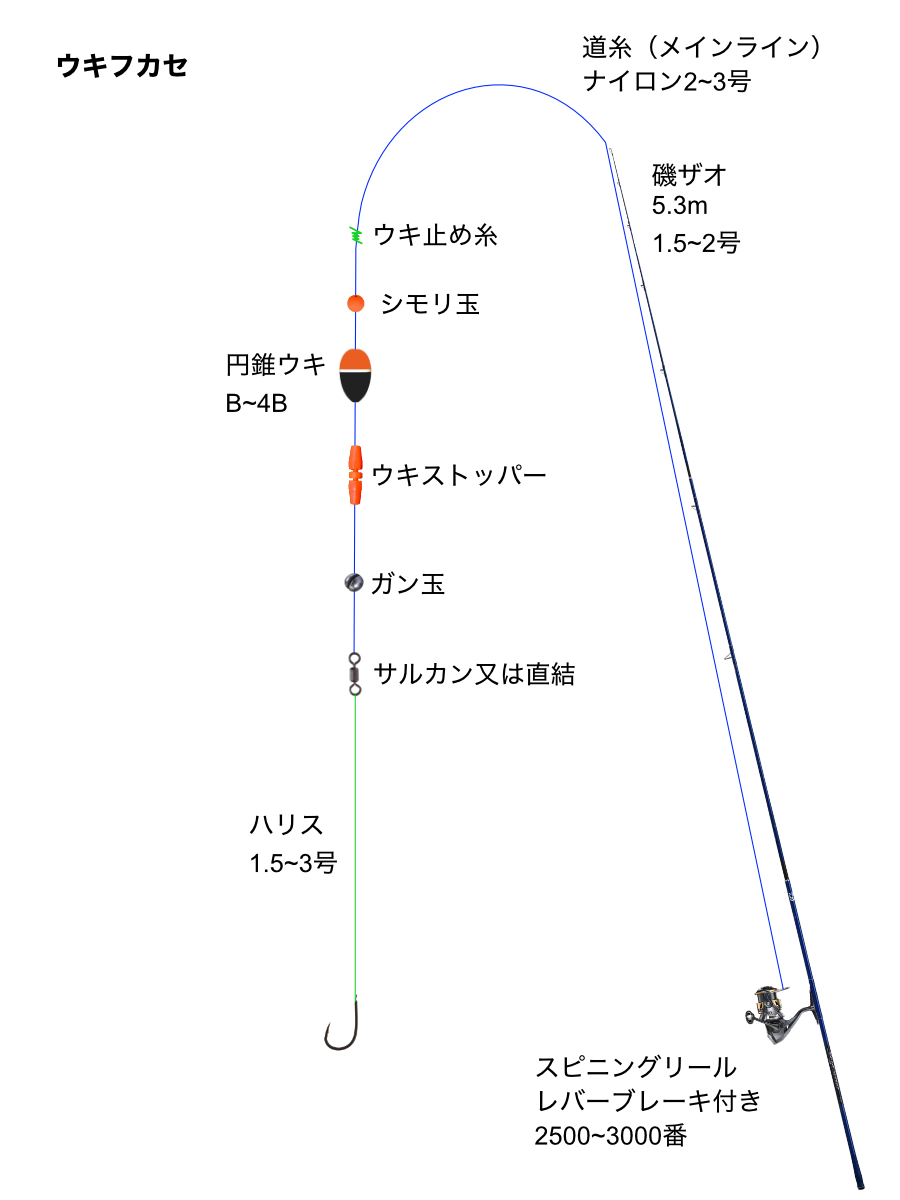
- Rod and Reel: A versatile 5.3m surf rod around 1.5–2号 is recommended. Use a 2500–3000 size spinning reel; a lever‑brake model makes handling large fish easier.
- Main Line and Float Components: Tie a float stopper onto the main line (2–3号 nylon), then thread on a stopper bead and the float. The float stopper sets the fishing depth (tana) where the target fish are located.
- Underwater Components: Below the float, attach a current‑catching rubber stopper to prevent tangling and help the rig drift naturally, then pinch on split‑shot weights (gun‑dama) beneath it.
- Leader and Hook: Connect the main line to a fluorocarbon leader (1.5–3号, about 2–3m long) using a swivel. Tie on a hook suited to the target species, such as Gure hooks or Chinu hooks.
Fishing Procedure
- Preparing the Chum (Makie): Mix crushed krill (okiami) with a powdered attractant and adjust the consistency with seawater. Add water gradually to achieve a cohesive mixture.
- Hooking the Bait and Casting: For the hook bait (sashie), remove the head or tail of the krill and attach it in a compact shape to prevent it from falling off. First throw several scoops of chum to gather fish, then cast your rig into the chum zone.
- Line Mending (Line Control): After casting, adjust the line with rod movements so it isn’t pulled by wind or current. Keeping “the main line trailing directly behind the float” is the key to letting the bait drift naturally.
- Bite and Hook‑set: When a fish takes the bait, the float will sink underwater. At that moment, lift the rod to set the hook.
- Landing the Fish: For larger fish, bring it to the surface and use a landing net (tamo) to safely retrieve it.
Related Movies

糸とアイの結び方(ダブルクリンチノット)

糸と糸の結び方(直結結び)

針と糸の結び方(外掛け結び)

ふかせ釣りの仕掛け、釣り方講座

オキアミの付け方
You have reached the end of the list